Friday, February 27, 2009

HOW TO KEEP A HUBBY HAPPY

This has been one long winter! But fortunately, we have been well fed and warm, so I can't complain...but damn it...where is spring? I am also fortunate enough to have a hubby that does not ice fish, play pool, watch sports, sit in the bar, or chase women that I know of! If he did chase women all I would have to do is wave a piece of wood in front of his face and he would come running back. Pretty simple to keep him around...a piece of wood and a cup of coffee and he thinks he died and went to Heaven. Nope, he isn't bored...to pass the time, hubby has been hard at it in the wood shop, using his magical turning lathe to turn trash wood into pieces of art. I know our kids are running out of room at their houses for the things he makes them but here are some more! Hey, even I get to keep a lot of the stuff!

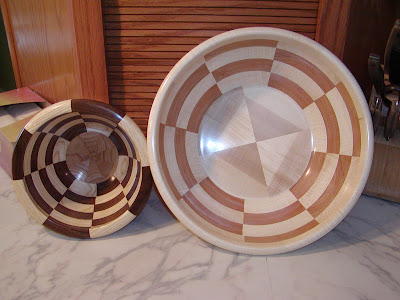
The first 2 bowls are made from Ash from our trees by our home and other exotic woods and the bottom 2 vessels are made out of the Boxelder trees that grow here also. The red that you see is a natural occurrence in the wood probably caused by some bug or fungus that got in the wood. Boxelder are just trashy trees that are not the prettiest things but they sure make some nice bowls!

I love to do woodworking myself but seldom get the time with work and quilting....it is not a priority. He did try to teach me the basics of wood turning. After 6 hours of turning down a football size piece of wood into a spool that still does not look like a spool, I decided I would stick with making my outdoor furniture and crafty things and leave it at that. I have better things to do!


Wednesday, February 11, 2009

How To Become A Happy Hooker


First of all….did you really want to know how to become a Hooker?

OK…then I got your attention so now if you are interested in Scrapbooking, Cricuteering, Cardmaking, or Stenciling, Etc. then just keep reading!

This is for those of you that might want to create your own stencils with any font of your choice, not just the MILITARY STENCIL look.

Call up any of the fonts you love in your favorite graphic program and add a little hook or piece to whatever letters you are using. See the BoDiddly Picture above. Normally we are only using a few words at a time and it is not problem to add a little piece that will hold the inside of a P, D, B, etc to hold it all together without really messing up the look of the font. You can make it swirl or make it straight, you add one or you can add eight. Hey! That rhymed! I digress..........
I then cut away the hook after I have it glued into place. Just don't put the glue on the piece you want to cut off. Glue down the piece and use a craft knife to carefully cut away any unwanted pieces. For something very ornate, this method works great.

This is wonderful for making stencils for glass etching. Set up your word or design and then add the hooks to the open areas of the letters that you don’t want to fall out, connecting them to the outside area. Cut it out in vinyl or contact paper, place it on the object and rub out any air bubbles and THEN cut away the unwanted part (hook). It makes for very accurate placement when you have a lot of open letters or something very ornate. Your inside pieces don’t get lost and they are placed perfectly where they are supposed to be. You then would proceed as you wish for etching glass or stenciling.

On the BoDiddly design, the Cricut would cut out all the white parts and the rest would be left including the insides of the letters. Glue in place or rub in place if it is for glass etching then cut away those little hooks holding the inside letter.

WALA….perfect placement everytime.

How to Take a Screen Shot

This is for those of you who have Windows XP and want to take a screen shot and are not sure how to do it. If you have Windows 7 you are already set with the Snippet Tool.  This works great if you see something on a website or want to share something in a program with someone. This is one way to do it. For those Cricuteer friends of mine, it is also great for showing everyone what you have drawn in Inkscape, MTC or SCAL or any program for that matter. This is a pretty easy way to do it.

I got this from www.microsoft.com/windowsxp/using/setup/tips/screenshot.mspx, Just in case you want to go there and look at a better explanation. I added a few of my own tips on here.

1. Click the window you want to capture. Press ALT+PRINT SCREEN by holding down the ALT key and then pressing the PRINT SCREEN key. The PRINT SCREEN key is near the upper right corner of your keyboard. (Depending on the type of keyboard you have, the exact key names on your keyboard may vary slightly.)
Note: You can take a screen shot of your entire desktop rather than just a single window by pressing the PRINT SCREEN key without holding down the ALT key. At this point, it doesn't look like it did anything but wait!
2. Click Start, click Accessories, and then click Paint. Personally, I have a Paint icon ready to go at the bottom of my screen. I use it a lot!
3. In the Paint window, click Edit, and then click Paste. (I just do a “Control V” to paste it)
4. When the image appears in the Paint window, you can decide if you want to keep the whole window or just cut out what you want to show. If you want to cut out a particular part, just use the upper left icon, a box type thing, and pull a line around the part you want and do a “Control X” this will take it out and put it on the clipboard. Go to “File”, “New” and you will have a new Paint screen. (I just do a “Control N”.) Next do a “Control V” which will paste just that selection you wanted on to the window.
Now go to “File”, and then click “Save As”.
5. In the “Save As” dialog box, in the File name box, type a name for the screen shot, and then click Save. (I would recommend saving in GIF if it is a special photo it will look nicer than a JPG)

You can now print or e-mail the saved screen shot just like you would any other picture.

I would recommend reducing the size of the window just a bit because it does such a nice job of capturing the screen that it fills up your Paint screen.

Saturday, February 7, 2009

MOM, HOW DO I MAKE A POT ROAST?

Oh, I can't tell you what sweet music it was to my ears when one of my daughters asked for advice. Yeah, I pretty much fall all over myself when they do.

This is the same daughter that called me from college and asked, "Mom, how do I fry an egg?"

Well, don't get me wrong on this, you have to know her. She is a great cook now but it was never an interest while she lived at home. She usually had her nose in a book. She can now make a Kolachy that puts any baker to shame. For some reason she just didn't want to learn to cook. Oh, I tried...at least the youngest daughter wanted to learn all the ethnic foods from her German/Norwegian background and thanks to Daddy, Czechoslovakian background. She even knows how to make Lefsa and just about everything in between, but my older one...well, she had to learn on her own time.

Well, her time has come! ON TO THE POT ROAST!

First of all, wash that roast. I don't know how many of you take a roast out of a package and plop it into a pan...but coming from a farm and watching how butchering is done...believe me...wash that roast! Wash pork chops, chicken, turkey, whatever meat you use. I haven't figured out how to wash hamburger yet, but if I ever do...I will let you know!

OK...Roast is clean.........Spray that pan! The greatest invention of the last century was Pam cooking spray and all the other cheaper brands that work just the same.

OK..pan is sprayed......now plop that roast in the pan.

Fill the pan up with water until about to the top of the roast but not over it. You don't want to boil it! Maybe a half inch below top of roast.

OK...now pour a packet of Lipton's Onion Soup Mix over the top of the roast. For you newbies, that is a dry mix that is in a box, by the soups in the grocery store. This is all the spices you will need. Do Not Add salt and pepper!!

OK...cover it, if you don't have a cover, use foil then throw it in the oven and cook at 350 degrees. I don't preheat my oven when I am cooking meat or a hotdish...that is a waste of energy...just do that for cakes and breads. Just throw it in there and start the oven.

I can't really say how long to cook it because it will depend on how big of a roast you have. I would say a 2 pound roast would be about 2 hours BUT....a 4 pound roast will not be 4 hours!!! No way!....let's just say about after the initial 2 hours, start adding 20 minutes per pound. Oh, just wing it on the first time around...you will get used to it. Believe me...you will make this roast over and over again.

OK...About an hour before the roast is done, add carrots, potatoes and onions. Well, I would add more onions because we like onions. I never fry a pound of hamburger without putting in a whole onion. It does not matter what I am making...you need an onion! AND...Please, don't just peel that onion and put it in there...wash the darn thing! You don't know where it's been! Same with any of the other vegetables, wash, peel, wash. OK...by now you know I am a fanatic when it comes to food preparation. Again, growing up on a farm...I know what we used for fertilizer and it was not pretty and you do not put it in your mouth! Wash it all! AND that goes for anything else you buy. I use soap and water to wash melons before I cut them otherwise you are embedding possible feces into your melon. You do not want to feed feces to anyone!

WOW...I got off topic....Here are some more recipes.

Pork Roast....see all the above BUT uses Lipton's Garlic and Herb Soup Mix. Similar baking time.

Baked Chicken....see all above BUT use Lipton's Garlic and Herb Soup Mix.
Bake at 325 Degrees for about 1 1/2 hours

Tuesday, February 3, 2009

THINK SPRING!


Now that we know that winter is almost over, 6 weeks or not...I am optimistic that spring is going to come screaming around the corner at any minute. So until I hear the screaming...I will remember last summer.

Our youngest daughter decided that Daddy needed a new puppy. We had our other Yellow Lab for almost 14 years before he passed away. We had been dogless for a couple years and to tell you the truth, it was nice not to have to worry about a dog any more. Oh, sure I missed old Charlie but it just was a responsibility that in our old age we didn't really need.

So along came Willy! What a bundle of energy. I know why old people don't have kids...we don't have the energy to keep up with them. The same goes for puppies. But he makes us laugh so much it is worth it. What a personality. He is more human than some of the people I know.

He loved to ride with hubby on the mower last summer. That will come to a halt this summer because at 7 months old, he is now way too big for that, about 70 pounds. We have no idea how big he will get at this rate. The UPS man was wondering when we were going to get him saddle broke. We might have to!

I am sure the warm milk and peanut butter sandwich he gets for a treat everyday doesn't help. We just have to make sure he doesn't get overweight.

He absolutely loves the vacuum cleaner. He will lay there while we vacuum him then rolls over and he let's us do the other side. The shop vac seems a bit much for him but...I think he likes the way the vacuum flutters his lips.

I can brag, he is such a good dog.
He eats his veggies......


He plays well with others..........


He helps with gardening............


He also sits when we tell him to..............


Yep, I guess we will keep him. He knows too many of our secrets already!


UPDATE ON WILLY TWO YEARS LATER

I have to say...I think we fed him well.  Willy has turned out to be almost human.  I cannot even begin to tell you the stories we have to tell or the times he has made us laugh.

First of all, he is under foot all the time.  That is natural for most dogs.  Second of all, he is always smiling.  I have never seen a dog smile so much in my whole life.  I have no clue what he thinks is so funny or what there is to be so happy about, but he apparently has found it.

As you seen in previous pictures, he was quite cute as a puppy.  His days of riding on the lawnmower on hubby's lap are over...well almost.  He still trys to sit on his master's lap but has to sit beside him instead.  We can't sit in the gazebo without him thinking he has to have a chair to sit in too.  


Here they are resting after hoeing the garden.  He listens very well to "Get outta the Garden"
His feelings get a little hurt so he goes and lays in the shade of the apple tree.  He sometimes goes and
plays with the cats.  His favorite cat that he plays with is pictured below.


This cat is the laziest thing I have ever seen.  All he does is eat, sleep, poop and just be cute.  He loves to be cuddled and petted but just don't scratch his tummy...those are fightin' moves. 

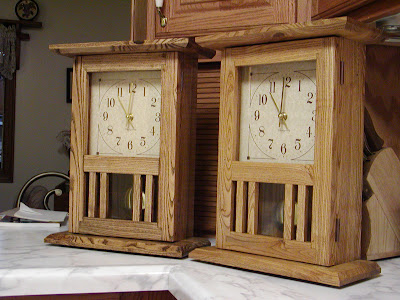
HANDCRAFTED ASH CLOCKS


These clocks were made from wood that grew out in our back yard. Our girls used to play around these very trees that the clocks were made from. Hubby thought it would be nice to make them each a clock out of the Ash trees that grew out there. He wanted to make them both the same but use different stains. For some reason they still turned out about the same color even though he used darker stain on one of them. It didn't seem to matter, the girls were thrilled with them.

I did nothing to help with this project except keep the coffee on and make an occasional caramel roll.

Hey, I know when to keep my mouth shut and let the man work!

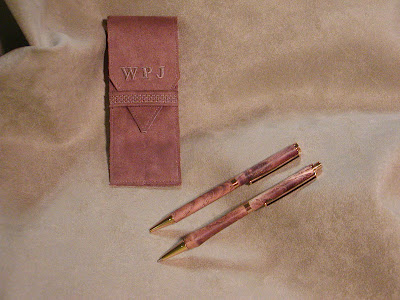
PEN AND PENCIL SET WITH HANDMADE CASE


This is a handcrafted wooden pen and pencil set made by hubby to give to one of his friends. He usually finds his own wood and then turns them on a turning lathe. He never knows how they are going to turn out. Everyone is different.

I will take credit for making the case for it.

HANDMADE JEWELRY BOXES


I thought I would share a few of my hubby's projects. These are a few of the many jewelry boxes that he made for our daughters.

GUILT QUILT


This is my Guilt Quilt. A coworker survived breast cancer and was thrilled about that as were her friends and family. She had a tough recovery but managed to pull through. I seen her one day and asked how she was doing, etc. She said, "Hey, would you make me a pink quilt? I will pay you whatever you want." I explained to her that I just didn't have the time right now and I had never sold any of my quilts. If anyone received one from me, it was from my heart. I volunteered to help her learn to quilt and perhaps she could make her own or her friends could help. I don't think she was interested in doing that at the time. I truly was so swamped with other things in my life that I just didn't have the time to do it for her. I felt bad because I didn't know where I would fit in the time for making a quilt.

Time went on and I found out that her cancer had returned, only this time, the doctors didn't think she would make it. I was devastated! I could not believe that I said I didn't have time to make her that quilt but here she was...with no precious time to call her own! Not even if she wanted more time...she would not find it.

I got right to work and made her the quilt she wanted and I presented it to her at a fund raiser held for her. I also found the time to make another quilt to donate for her fund raiser auction.

That was about a year ago and she is still working at getting well. I believe it is at a Cancer Treatment Center that she is receiving help and they are giving her hope.

So I learned a valuable lesson. I might think my time is precious but the time I make for others is much more precious.

COLOR FOR A COLORFUL PERSON


This quilt was one I whipped up real quick when a coworker was diagnosed with a progressive brain tumor. She was always the one doing something crazy at work. Full of fun and made me laugh whenever I seen her. I wanted to get something to her that was bright but would still have space to sign by all the coworkers. I thought I had plenty of time to do this but for some reason, this quilt whipped together faster than I had ever quilted before. It was designed, cut and quilted all within a few days. Everyone at work signed it and presented it to her.

The sad part is, she passed away 8 weeks from the time she found out. Apparently there was a reason that quilt fell into place so quickly. I was so glad that she seen how many people really cared about her.

SAVE THE CHAIR


This chair has special meaning to my friend, Lil' Miss Frugal. It is a 112 years old. It was carved by a relative of hers way back in 1897 and she will make sure it stays in the family. It proudly sits in the dining room perhaps waiting for another member of the family to occupy its seat. It's just as sturdy as the day it was made. You can tell the spindles are hand carved. They are not perfect like the ones manufactured today. Every piece on that chair is a labor of love.

I am not sure what kind of glue they used back then, but I need to get some. If that glue lasted over 100 years...it is something us paper freaks need to get ahold of!

IT IS SUCH A SHAM


Yep, these are some really cute Pillow Shams that my friend, Lil' Miss Frugal, bought at the Thrift Store for a $1. They are just adorable and I had to share. I want to keep trying to get people to support your local Salvation Army Thrift Stores or any other organizational stores that are non-profit. Not only do you get a great bargain, you help others too. You just might find the bargain of the century!

Fudgy Peanut Butter Chocolate Chip Muffins

A good nutritious muffin! Yeah, right! How bad can it be, it has oatmeal and applesauce in it. Lil' Miss Frugal served these to me while we sat and admired her Bookcase Quilt.


INGREDIENTS Makes 12 muffins

1/2 cup applesauce
1/2 cup quick cooking oats
1/4 cup butter, softened
1/4 cup peanut butter
1/2 cup white sugar
1/2 cup packed brown sugar
1 egg
1/2 teaspoon vanilla extract
1 cup all-purpose flour
1/4 cup Dutch process cocoa powder
1/2 teaspoon baking soda
1 cup mini chocolate chips
1/4 cup confectioners' sugar for dusting
DIRECTIONS

Heat oven to 350 degrees F (175 degrees C). Line muffin cups with paper bake cups. In small bowl, stir together applesauce and oats; set aside.

In large bowl, beat butter, peanut butter, sugar, brown sugar, egg and vanilla until well blended. Add applesauce mixture; blend well.

Stir together flour, cocoa, baking soda and cinnamon, if desired. Add to butter mixture, blending well. Stir in mini chocolate chips.

Fill muffin cups 3/4 full with batter. (ice cream scoop works awesome!)

Bake 22-26 minutes or until wooden pick inserted in center comes out clean. Cool slightly in pan on wire rack. Sprinkle muffin tops with confectioners' sugar, if desired. Serve warm.

BARGAINS GALORE!!


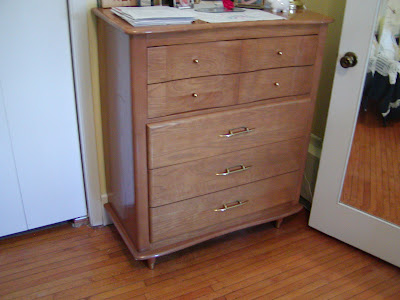
My friend, Lil' Miss Frugal... paid only $58 for this set of bedroom dressers. They are just beautiful in person. They are also in perfect condition. They have dovetail drawers and the handles are still beautiful.
She has got to be the best Thrift Store shopper on earth.
Her home is filled with beautiful treasures that others thought was trash. I think I am going to keep her around for my next Thrift Store shopping spree.
Not to mention she served me some great Fudgy Peanut Butter Chip Muffins that she said where healthy. You be the judge, I will post the recipe.

Sunday, February 1, 2009

BOOKCASE QUILT


This is a photo of a quilt that I made for one of my friends who lent me tons and tons of books. I really did owe this woman a lot for her generosity. She has now moved into a newer home and has her very own Sun Room which she turned into a reading room, which I have dubbed....The West Wing Library. After putting in her new book cases she hung the quilt up behind it on the wall. I was shocked at how well it looked together with the bookcases.

I have different things appliqued on the quilt but the majority of it is all pieced. From a distance it looks like a bookcase up against a flowered wall, with feet on the bottom and a fish bowl on top. There is a seashell on a stack of books and a jar of butterflies on one of the shelves. There is also an angel on one of the shelves...something she collects.

It was so much fun to make and think of the person that was going to receive it.

EASTER VEGGIE TRAY


Here is an idea for your Easter table. It's a little bread bunny! When I made this I used frozen bread dough, made little round balls for feet and hands. Bigger dough balls for head and body. I made a rope of dough and folded it in half to make the ears. I used 2 raisins for the eyes and 2 sliced almonds for the teeth. I cut out the tummy and we filled that with dip when we were ready to serve.

Mealtime came and needless to say, they started to eat the little guy's arms and legs off! Next someone grabbed an ear and someone swore they seen the bunny's nose twitching and the next thing I knew, his nose was gone...leaving teeth and eyeballs, oh, all right, raisins and almonds...but still! It ended up like a feeding frenzy and by the time the meal was over he looked like road kill. But you know what, rabbit ears are very tasty dipped in vegetable dip.

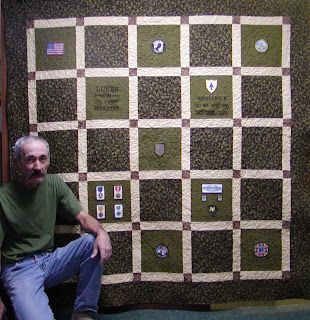
QUILT OF HONOR


Here is my hubby with a quilt that he designed with a special Veteran in mind. He spent a long time researching for this quilt. He spent numerous hours looking up the medals and badges that represented what the Veteran had earned. He wanted it to be perfect. It took almost a year to complete. He thought it was time that this person was recognized for his service to his country. This Veteran received numerous injuries in the war and at one point they didn't think he would make it. He did make it and continues to serve his country by being a very active member of the VFW.

It was an honor for me to help with this.

The Denim Bag


I made this little bag from a pattern that is on here:
http://www.allpeoplequilt.com/quarterlychallenge/APQ_QtrlyChal3.pdf

It was really easy and I just used some of my old denim pants. If you knew me you would quickly realize that I must have had quite a bit left over to use for something else. Well, yes, that is true, one pair of my old jeans could probably make a queen size quilt. On the other hand, an old pair of my husband's jeans would barely make an eyeglass case.

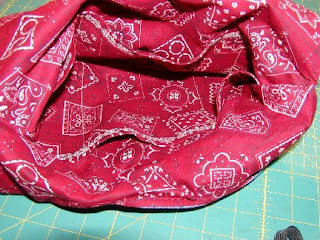
This was really was a fun one to do. I lined it with red hankerchief material and put lots of pockets on the inside. You put the long handle through the short handle to carry it.

THE QUILT FROM HELL


This started out as a very long story and try as I might...it can't be changed. So if you are ready for a small novel, read on!

What started out as a pattern called "Not All Quilt Blocks Are Square" which at first glance appeared to be a cute simple pattern. I thought to myself, "OK...I will try that one. I desperately need to get one done for Relay For Life and this will be quick. "Oh, and how wonderful, they actually have a kit for it. I don't even have to pick out fabric! It is all there!"

I was quite excited at this point and couldn't wait to get home and start in.

It was just gorgeous flannel and I couldn't wait to get my hands on it. So many colors and I figured I would have tons of left overs by the amount it showed in the kit. Well, that was my first mistake. I opened it up only to find that they had put in pieces that were 8" x 10" not the customary 18" x 22" fat quarter. OK...I guess they know best. I will cut what there is.

So I started cutting. Oh, it wanted to move and twist if I stacked too many together. Why didn't they just give me yardage and I would have had it cut out in no time. Oh, no, that would be too easy...they wanted me to stack all the pieces on top of one another and then ever so neatly, cut them apart.

OK...got that done, most were not perfect by a long shot but I believed they must mean to square them up after sewing. WRONG! They have to come out perfectly. Oh, that only took a day to cut out! Maybe I am slow...but you had to be so careful!

Alright, by this time, I really noticed that I would be sewing on the bias, and for those of you who don't sew...this is the stretchiest angle of the fabric to sew. You sometimes sew on the bias to make it curve around something, etc. See what I mean? OK...things were not going well at all. Had to sew very slow and carefully. And for Pete's sake, you can't use steam to iron them or they will distort.

OK...another day passed, and half of another and I had the blocks all sewn.
WHAT?????? There is a piece missing? No way. It was a kit, they can't be wrong. I checked and double checked. Nope...there was a piece missing. Not only was there a piece missing...it meant that I had to have at least 2 pieces of fabric that would work with the rest and I would have to take apart 2 of the squares so I could blend in the new colors. GRRRRRRRRRRRRR.

OK...patience my dear. I searched in my fabric stash, "Thank You, God, for my Stash" a prayer that should be hung in every quilting room...I don't even care if you are atheist....you will be thankful to someone for that stash!
I FOUND THEM! Yes, for some reason in the last couple years I had picked up the same fabric along the way. WOOHOO

OK...got that cut, tore apart some squares, made it look like it was supposed to be that way. "Creative License" I believe it is called.

Ah, now the fun part! I get to sew all the squares together. I laid them all out to see what would work and apparently it really didn't matter. I figured it would go well putting all the rows together. I was burning the midnight oil and kept telling myself..."My goal is to finish this quilt top today".

WELL...that came to a grinding halt. It appears that who ever made this pattern could not have possibly sewn it together. Maybe she had her friends do it and they didn't have the heart to tell her that there would be 8 fabrics that would be meeting at one point! OK...here is where it really started to be the Quilt from Hell! Eight pieces of fabric do not lay down well when they are all going in different directions and are bunched up in one corner. I felt like taking a hammer after it to smash the fabric into one another. For some reason, the screaming didn't help. Maybe if hubby hadn't been sleeping I would have felt that it did some good. I think it has something to do with that story about "if a tree falls in the forest..."

Well, after having chocolate and coffee I was able to relax and keep working. Nope...didn't get it done in a day...what was I thinking? Have to start again tomorrow.

OK...fresh new day, fresh new start, the borders went quite well and I used a method I just read about. I will share that some other time.

OK...quilting time 2:30pm. Careful...that flannel is still stretching...don't pull too tight. Oh, wait...that is exactly what the quilting frame will do! I had to be so careful to ease in the sides and stitch slowly, pushing fabric in here and there.

Had to change the needle, kept hitting those lumpy layers of fabric but I did get them to go down at some points. Tension was off, at one point I rolled up the quilt to do the next row and there was the most humongous bird's nest on the other side. Apparently along the line the thread got out of whack. At this point I had to actually "relieve" myself I was so upset.

OK...body free of toxins, I got to work taking all those stitches out. My back still hurts from bending over it and I have a slight limp to remember it. OK...maybe I did have that limp before.

THEN...for some reason to top things off...I was on the home stretch and the thread kept breaking and I only had a little left to do! It would sew 6 inches and break. I finally changed the spool of thread and it seemed to work. Not sure if that was it or not...but it worked.

I finally finished it. The binding actually went on quite well...maybe it felt sorry for me at this point...not sure!
I started at 2:30 p.m. and completed it by midnight. Sure seemed like a long 4-5 hours because that is what I usually tell people it takes to quilt a quilt.

So the moral of this story (and yes there is one) is how I justify it all.

This quilt was made in honor of a dear friend...a cancer survivor and hopefully will be raffled off for Relay For Life.

I complain about the tough time I went through making this but it is nothing compared to what my friend and all the other cancer patients have went through and all the future cancer patients will go through. My few hours of what I call suffering is nothing. I was able to fix things, make it work and that is what we want Relay For Life to do. We want to fix our cancer patients, we want our research to work and we want our whole world to be cancer free.

If we can do that, and we free the world of cancer my work and everyone else's will be all worth it. I just feel my work is a small part of the huge picture but it is those small parts, just as in a quilt, that make up the whole picture.

Nah, I won't quit making quilts if we suddenly find a cure because someone, somewhere still needs the warmth and comfort that a quilt gives. I will continue doing what I can for Relay For Life and Quilts of Valor no matter if the Quilt From Hell suddenly appears at my sewing table. I will just have to take it and make it just Heavenly!

Please if you have access to buying a ticket please do so because I will NEVER make this quilt again!

LIVING IN THE STICKS

I shot these pictures out of my kitchen window. It is a coyote digging up apples from under the snow and taking them to the trees and eating them. He would sneak back out and get another one and head back to the trees. He was pretty scared someone was going to catch him. He probably would have been scared of his own shadow.

There are several of them around our farm and they make for some pretty creepy howling on some nights.


A NEW BAG FOR AN OLD BAG


Here is another bag that I designed for a friend for Christmas. I have seen her several times since but do you suppose I have remembered to bring the gifts?

Anyway, I thought she needed a bag to bring her stuff in to work with. I had to laugh when I made this for her because I thought of her the whole time. She normally comes flying into work, holding her wonderful Coach purse, a plastic grocery bag of newspapers, an extra coat or something draped across her arms. Hair still flowing in the breeze from riding her motorcycle...summer only!

She is either going to need this larger tote or a shopping cart stolen from a grocery store! I can't wait to give it to her. Oh, and there are Godiva Chocolates in there too!

DESIGNER BABY BAG


Here is a photo of a diaper bag and a little chenille blanket that I helped make for a friend. She came over and we designed a diaper bag. I think it took longer than we thought because we did not get the bag done that day. We got a little side tracked. Had to pull out the stencils, rubber stamps, paintsticks and rubbing plates. Felt like a kid again! But after 11 hours I had to let her go...we had so much fun! We will plan another day! Woohoo!